

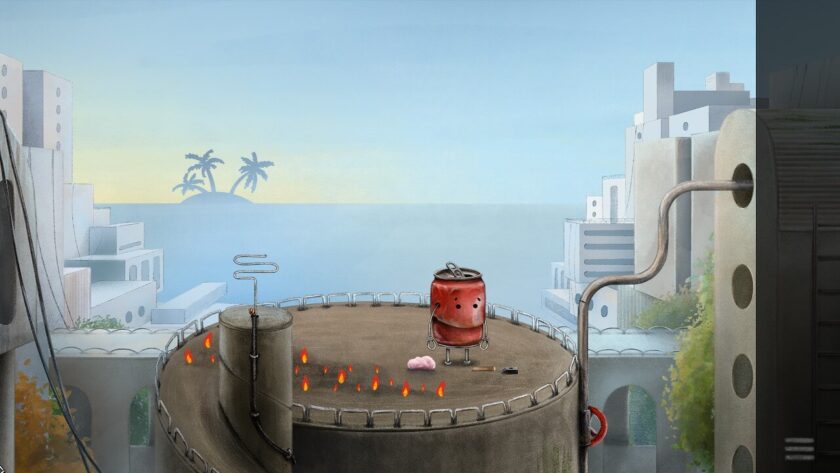
Boxville 2 is a story about Red Can going to help find his friend. The game scored our highest rating and you know our motto: when we love a game, we try to make a guide! So here it is: The Boxville 2 Guide!
Boxville 2 Guide – Table of Contents
Some of the puzzles in Boxville 2 are a little bit trial and error, however some have exact solutions. This Boxville 2 Guide will give you ideas for each area, and the solution to the puzzles (click on the blue writing to reveal the answer!).
In the City & China Town
On the Rooftop
Ice Cream Seller
The Stage Lighting
Vending Machine
Pulley Wheel Chain & Radio Can
Fortune Cookie Seller
The Stage Bunting & Noodle Can
Poster Information Pillar
The Artist Can
The Sticker Book
Black Bow Tie Can & The Gallery
In the Sewers & Lock
The Sewers
Lock Control Room – Levers
Lock Control Room – Valve Wheels
The Boat
Hot Air Balloon & Pasture
The Watermill
Old Can & Tin Cow at the Pasture
The Bee Keeper
Hot Air Balloonist
Lighthouse & Wharf
The Parrot
The Boat Repair Can
The Bar
The Fortune Teller
The Lighthouse Keeper
The Pirate
Out at Sea
Above Deck & Setting Sail
Below Deck & The Treasure Chest
In the Sea & The Mermaid Can
The Island
Repairing the Totem
Repairing the Necklace
On the Rooftop
Pick up the bubble-gum, wooden handle and hammer head. In the inventory panel, combine the hammer head with the handle, by selecting the one and releasing it whilst over the other.
Use the hammer on the water pipe to the right to cause a spray of water over the flames. The hammer knocks the aerial off. Use the bubble-gum on the hole to stop the water.
Return to the Table of Contents
Ice Cream Seller
At the bottom of the ramp from the rooftop is the Ice Cream Seller. Help them arrange the ice creams. The order changes each time, but the count on the board will tell you how many are in the right place. You’ll be rewarded with an ice cream.
Return to the Table of Contents
The Stage Lighting
Talk to Yellow Work Can. The sketch show a hare in the centre and a tortoise on the outside. Click on the large lighting stand. There are six lightbulbs which need to be placed in the concentric circles. Try putting each one into the outer ring. How fast do they go?
Which goes where?
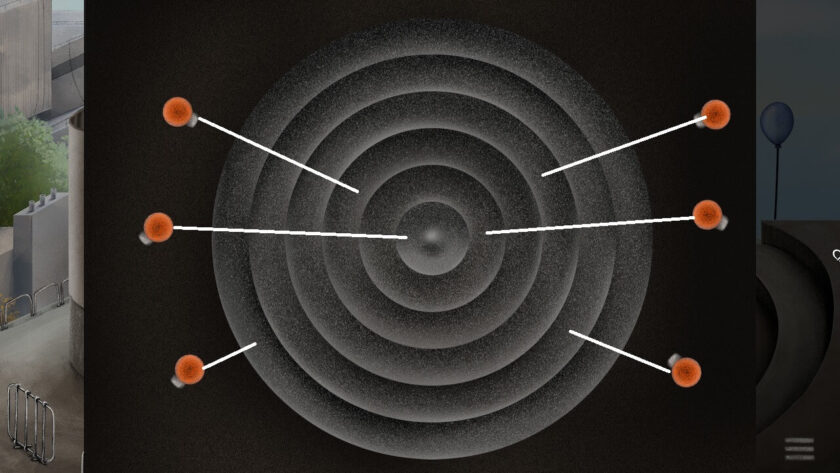
You’ll get a balloon for fixing the lighting.
Return to the Table of Contents
Vending Machine
Speak to Yellow Can. They explain that they put money into the vending machine, but no lollipop came out. Examine the vending machine, and you’ll see a ticket falls out.
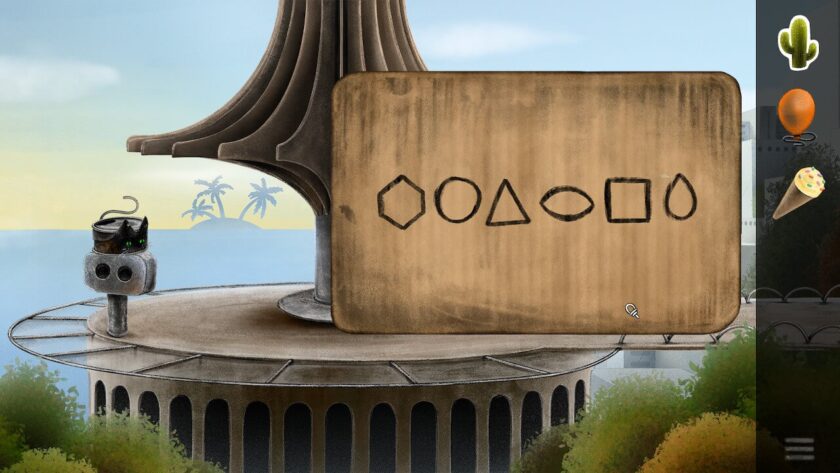
The vending machine needs a code, and the ticket has the answer. What can you count on the different shapes?
Vending machine code:
It’s the number of points, e.g. the hexagon has 6. So the code is: 6, 0, 3, 2, 4, 1
Give the lollipop to Yellow Can. A mouse will appear, which is then chased by the cat. Yellow Can then gets out the sticker book. You can now look through the tower viewer.
Return to the Table of Contents
Pulley Wheel Chain & Radio Can
Pulley Wheel Cable Lift
There is something stuck in the pulley wheel chain. Remove the aerial and return it to the rooftop. Unfortunately, the chain breaks on the cable lift, so this will need repairing.
Radio Can
The posters, outside the Radio Can’s office, show a set of ‘do nots’: no cats; no loud noises; and no ice cream. Once the aerial is fixed, you’ll be able to enter the office. You’ll notice that there is a cactus and paper clip model on the shelf. Wonder if either of those would be useful?
No ice cream
Use the ice cream from the Ice Cream Seller on the Radio Can. The Radio Can will jump and move the paper clip.
No loud noises
Use the balloon on the cactus. The Radio Can will jump and move the paper clip. You’ll end up with a piece of string and a burst balloon.
No cats
Use the string and burst balloon on the cat. The cat will follow you into the office. The Radio Can will jump and move the paper clip.
Once the paper clip model has fallen, you’ll be able to reach it from the outside.
Getting the paper clip
Radio Can will stop you from grabbing the model, unless he is distracted. Return to the rooftop and unplug the aerial.
Pulley Wheel Cable Lift
Use the paper clip to fix the pulley wheel cable lift. The stranded Brown Can will give you a ticket as a reward.
Return to the Table of Contents or Black Bow Tie Can & The Gallery
Fortune Cookie Seller
The Fortune Cookie Seller has drifted away from the edge of the dock. Give them the spoon oar to get back. However, the oar and the fortune cookies fall into the water. Maybe there is a hook nearby which you could use? Although the hook alone is not long enough.
Hook and pole
Collect the bamboo cane from the awning, near the Noodle Can. Take the hook from the no-fishing sign. Combine them together to make a hooked pole. Use this on the fortune cookies.
You’ll get a fortune cookie for helping the Fortune Cookie Seller. Wonder what’s inside?
Break open the fortune cookie
Place the cookie on the stone near the entrance to the dock, by Noodle Can. Use the rope to drop the rock onto the cookie. Do this twice to crack open the cookie and reveal the football sticker.
If you talk to the Fortune Cookie Seller again, they will help you get to the island, if you could find them a replacement spoon oar.
Return to the Table of Contents or Return to The Sticker Book
The Stage Bunting & Noodle Can
Noodle Can
Noodle Can will not give you a noodle, so you’ll need to distract him in order to grab one. Maybe cause some issue with the wok?
What to do with the wok?
You’ll need the bucket, which is found on the floor by the vent pipes, near The Artist Can. Fill the bucket with water from the dock. Throw the water over the wok when Noodle Can is not looking and grab the noodles.
The Stage Bunting
Noodles will work fine as a substitute for the string. Once you’ve got the noodles, give them to Purple Work Can, and create some new bunting.
Bunting
There are many solutions, but the principle is to place adjacent bunting pieces based on the same colour or the same shape.
Purple Work Can will reveal a piano sticker. Grab the sticker for the sticker book.
Return to the Table of Contents or Return to The Sticker Book
Poster Information Pillar
When you examine the poster information pillar, the puzzle appears. It consists of three rectangular posters, which contain a small, medium and large square. What could these shapes mean? Underneath the three squares are 12 pictures of various items, like a glow bug, a barrel and a scooter. Can you group these pictures?
Hint 1:
Looks like there are three modes of transport.
Hint 2:
Sort into size, start with the roller boot and place it under the small square. Next, place the scooter under the medium square and the bike under the large square.
What goes where?
Under the small square: cup, maracas, roller skate, and glow bug. Under the medium square: scooter, bottle, guitar, and light bulb. Under the large square: bike, drum, sun, and barrel.
You’ll get a tree sticker for your sorting skills.
Return to the Table of Contents or Return to The Sticker Book
The Artist Can
When the bucket was removed, the pipes moved apart. The Artist Can cannot continue working on his masterpiece if he is distracted. Is there a way to fasten the pipes together?
Fixing the pipes
Use the stapler, which is found on the stage by the bunting
Go into The Artist Can’s studio and examine the puzzle on the wall. The puzzle has a different starting point each time, but use the arrows to move the column or row. As there are two blank pieces, it’s easier to start completing the picture from the top left.
What’s the picture?
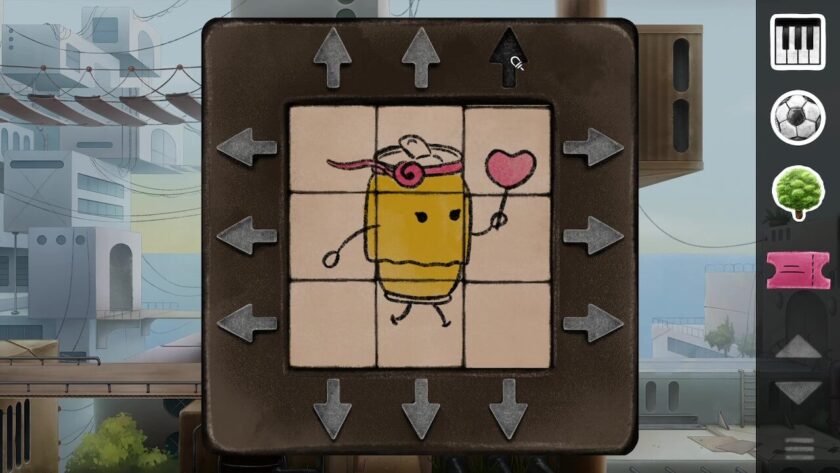
You’ll be rewarded with a key. Have you seen any locks to unlock?
Return to the Table of Contents or Return to The Sticker Book
The Sticker Book
When you first look at the sticker book, you will see 10 stickers. However, to complete the picture equations, you’ll need another 5.
Cactus Found on the wall, near Radio Can
Football Inside the fortune cookie
How do you get the fortune cookie? Fortune Cookie Seller
Heart In the padlocks, near Ice Cream Seller
How do you get the key? The Artist Can
Tree Solving the poster information pillar puzzle
Poster Information Pillar
Piano Creating the bunting
The Stage Bunting & Noodle Can
What plus what makes what?
The equations don’t have to be in the same order vertically, nor do the two stickers making the sum.
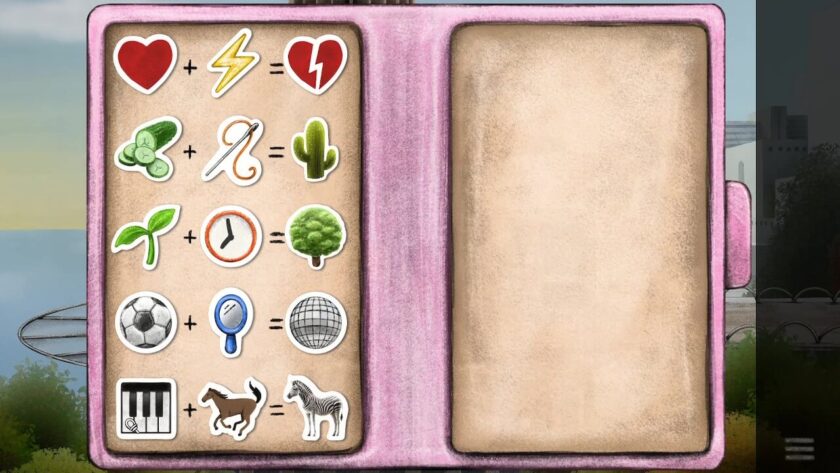
You’ll be rewarded with a square tile piece with a triangle on it.
Return to the Table of Contents or Black Bow Tie Can & The Gallery
Black Bow Tie Can & The Gallery
Black Bow Tie Can
Black Bow Tie Can will not let you into the gallery, unless you give them something.
How to get the ticket
Rescue Brown Can from the broken pulley wheel cable lift
Pulley Wheel Chain & Radio Can
The Gallery
You can’t take the spoon while Black Bow Tie Can is watching. You’ll need to distract them.
Examine the art installation at the far left. There’s a tile missing.
How to get the missing piece
Complete the sticker book.
The Sticker Book
How to distract Black Bow Tie Can
Get all the pieces in the puzzle to show the impossible triangle. Each tile will light itself and the adjacent pieces. Once complete watch the ball moving round the shape. Black Bow Tie Can will come to look as well. You can now grab the spoon and give it to the Fortune Cookie Seller.
Return to the Table of Contents
The Sewers
You can wander round aimlessly, but is there anything pointing which way to go?
Reaching the exit
Follow the green arrows. You’ll need to remove a piece of paper on the wall to reveal the last one.
Return to the Table of Contents
Lock Control Room – Levers
In the lock control room you’ll see two wheels and a control panel, which is missing some levers. You’ll need to find two more levers before being able to raise the water levels.
First missing lever
Check the door into the control room.
Second missing lever
Check the ladder outside the control room.
Placing the missing two levers will turn the bottom light green. You’ll need to work out how to move the levers, so that they all line up with the red circled green light. The numbers at the top, show how clicking the first lever will move all the levers. Try working out the patterns for the other levers. What are the differences?
Lever Two
-1, -1, +1, +/-2
Lever Three
-1, +/-2, -1, +/-2
Lever Four
–1, +/-2, +1, -1
How to get the green light
Use the second lever twice. Use the fourth lever twice. Use either the first or third lever twice. A cloth will fall from the ceiling.
You’ll now be able to access the deck of the boat.
Return to the Table of Contents
Lock Control Room – Valve Wheels
Take the rope and oil from the boat.
Can’t pick up the oil?
Grab the cloth from the floor of the control room and clean off the spilt oil.
Valve wheel won’t move?
Use the oil on the wheel
But there’s only one of me!
Use the rope on the wheel.
Return to the Table of Contents
The Boat
The boat is now high enough to go inside. Sailor Can will challenge you to a game of battleship. Click on a square to try to discover where his boats are. There will always be a clear block surrounding a boat, and the boats are horizontal or vertical, not diagonal.
Once you’ve won, you’ll be able to climb the ladder.
I’m on the top of the boat, but what do I do?
Grab the ladder, this will help you climb out of the lock.
Return to the Table of Contents
The Watermill
Patterns
Talking to the Potter Can will cause him to upset the pattern walls. Help create a diagonal wave, horizontal wave and circle patterns.
You’ll be rewarded with a crank handle.
Water Wheel
Use the crank handle on the crank pole outside the watermill. Complete the puzzle by raising and lowering the water levels until they are all the same height. The water wheel will turn, but gets stuck on a rock.
Breaking the rock
You’ll need the pickaxe from Old Can at the pasture
Remember to talk to the Potter Can once the water wheel is turning.
Return to the Table of Contents
Old Can & Tin Cow at the Pasture
Talk to Old Can at the pasture, and you’ll be asked picture maths questions. Drag the cards into the formula. There is no penalty for a wrong answer, and the red cross over the equals sign will disappear when you get the right answer.
I can’t do the maths!
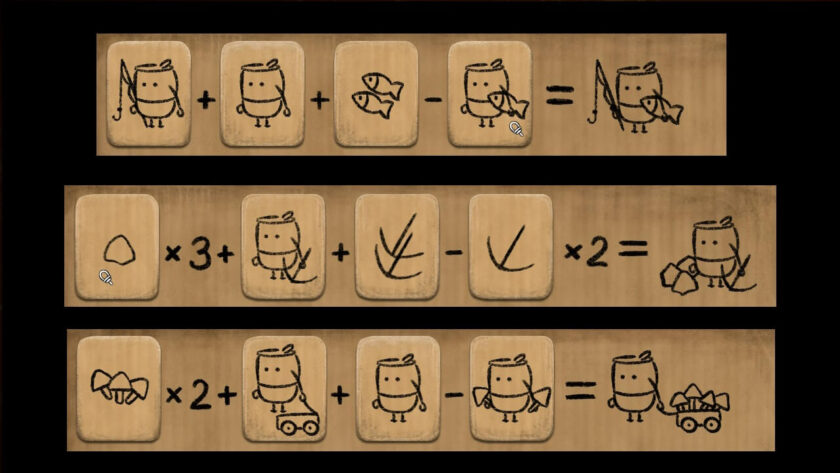
You’ll be rewarded with a pickaxe, and a couple of rocks on the weighbridge. Although the gate isn’t fully open yet, you’ll need two more rocks to get into the field.
What to do with the pickaxe?
Have you checked out the water wheel?
Where are the other rocks?
One is blocking the water wheel. The other is being used by the Hot Air Balloonist.
What does the Tin Cow do?
Release the Tin Cow, and you’ll gain some rope, and she’ll knock off the flower.
Return to the Table of Contents
The Bee Keeper
The Bee Keeper is being bothered by the bees. You’ll need to find something to distract them.
What will distract the bees
Water the flower. The watering can is near the watermill, and there is a hydrant by the hot air balloon.
Once the bees have moved, you’ll need to sort them into the right hive.
How do I swap the bees?
You’ll need an additional flower to enable the bees to be rotated. Tin Cow will be able to get this for you.
How to swap round the bees
The puzzle should start with two red bees and a blue bee on the small flower.
- Click on the small flower to swap the red and blue bees.
- Click on the large flower three times, so the green bee is in the centre of the small flower.
- Click on the small flower to swap the yellow and red bees.
- Click on the large flower five times, so the green bee is in the centre of the small flower.
- Click on the small flower to swap the blue and yellow bees.
- Click on the large flower eleven times, so the yellow bee is in the centre of the small flower.
- Click on the small flower to swap the green and yellow bees.
- Click on the large flower ten times, so the green bee is in the centre of the small flower.
- Click on the small flower to swap the green and yellow bees.
- Click on the large flower to move the bees near their hives.
You’ll be rewarded with some honeycomb.
Return to the Table of Contents
Hot Air Balloonist
Fixing the Balloon
The Hot Air Balloonist is struggling to reach the top corner of the sticky tape. Perhaps he needs something else to stand on?
What else could he use?
He needs the stool from Potter Can, but you’ll have to repair it with the broken pickaxe handle.
Heat source for the balloon
The Hot Air Balloonist will then ask for a candle. How can you make one?
How to make a candle
You’ll need a bowl (from Potter Can), some rope (from Tin Cow) and some wax (from The Bee Keeper). Combine the three items together and give the candle to the Hot Air Balloonist.
Use the honeycomb in the honey extractor, near The Bee Keeper, to separate it into wax.
Once in the air, Hot Air Balloonist will show you his life story. Sort the pieces into the right sequence. It might be easier to first put the pieces onto the rectangles, click a piece and then click the rectangle in the background. Click two pieces to swap them.
What’s the order?
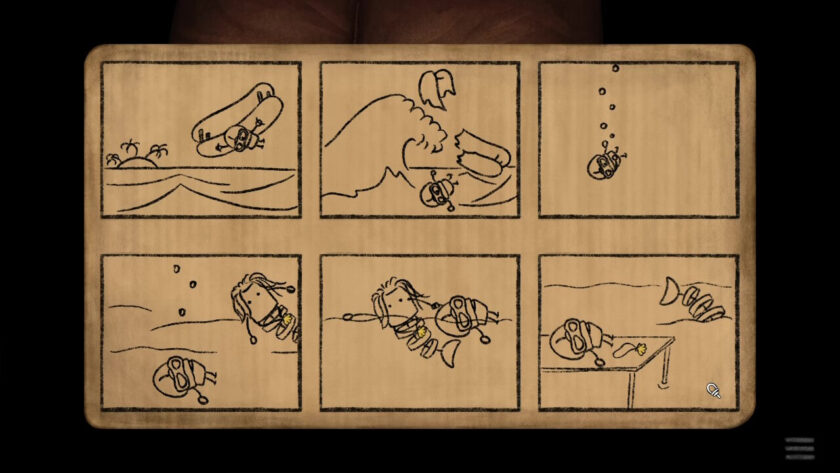
You’ll be rewarded with a mermaid’s pendant.
Return to the Table of Contents
The Parrot
The parrot will not allow you to leave the area. What can you do? Maybe the parrot would be distracted if it could eat the fortune cookie.
Break the fortune cookie
Grab the piece of rope from the boat, and you’ll receive the metal nut. Throw the nut from the lighthouse window.
Return to the Table of Contents
The Boat Repair Can
Fix the Boat
You’ll need to give the Boat Repair Can the tools in the right order.
The order is…
Hammer; Yellow screwdriver; Green wire cutters; Spanner or wrench; Blue tape; and Red screwdriver.
The reward is a battery.
Access the Crane Control Room
Put the battery into the battery box and then complete the Tetris like puzzle. Use just the three shapes shown to complete the whole area.
One solution is:
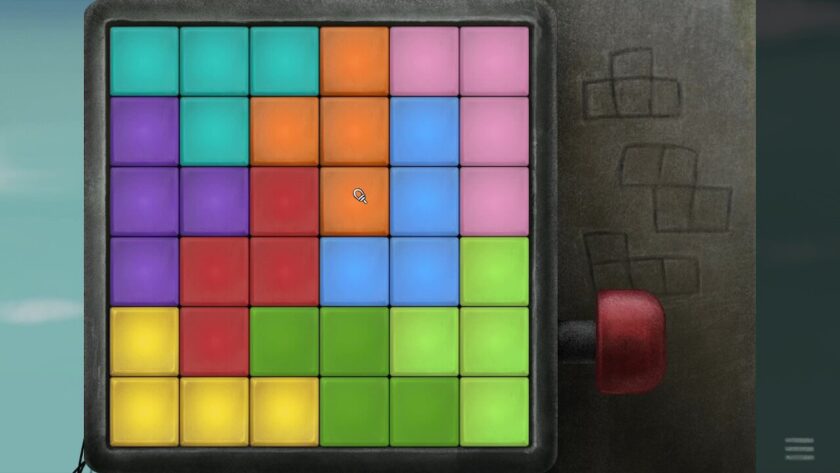
Use the Crane
Enter the control room and click on the control panel. Follow the directions given by the Boat Repair Can to use the crane. The keypad starts with one in the top left corner. You’ll need to get nine in a row to succeed.
The reward is a message in a bottle.
How to get the message.
Throw the bottle out of the lighthouse window. Then follow the bird to the crane. Try to grab the bird to make it drop the map piece.
Return to the Table of Contents
The Bar
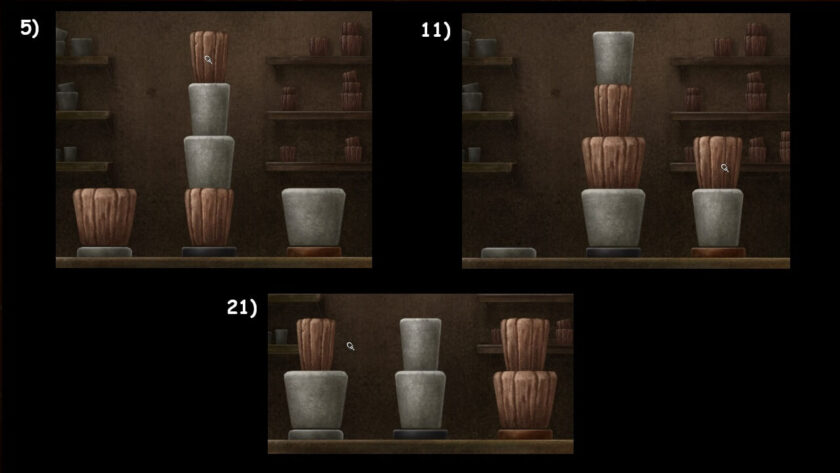
Hat Can would like another drink. Solve the Tower of Hanoi variation puzzle which Bartender Can sets you. You have to swap the three wooden (brown) cups with the three stone (white) cups. However, you can’t stack more than four cups, and you must always place smaller cups onto larger ones.
How?
- Move one of the small cups (e.g. wooden) on top of other small cup (stone).
- Place the medium wooden cup in middle.
- Move both small cups on top of the large wooden cup.
- Move the medium stone cup onto the medium wooden cup in the middle.
- Move both small cups on top of the medium cups.
- Move the large stone cup onto the large wooden cup.
- Move both small cups on top of the large cups.
- Move both medium cups to the empty end.
- Move both small cups on top of the medium cups.
- Move both the large cups into the middle empty space.
- Move both small cups on top of the large cups.
- Move both medium cups to the empty end.
- Move both small cups on top of the medium cups.
- Move both large cups to the empty end.
- Move both small cups on top of the large cups.
- Move both medium cups into the centre.
- Move both small cups onto the medium cups.
- Move the large stone cup to the empty end (now at the opposite end to where it started).
- Move both small cups onto the large stone cup.
- Move the top medium cup (wooden) onto the large wooden cup.
- Move the top small cup (stone) onto the stone medium cup in the middle.
- Move the small wooden cup onto the medium wooden cup.
- Move the small stone cup onto the small wooden cup.
- Move the medium stone cup onto the large stone cup.
- Finally move the small stone cup onto the medium stone cup.
The reward is a drink, which you can give to Hat Can. Hat Can will give you the match.
Return to the Table of Contents
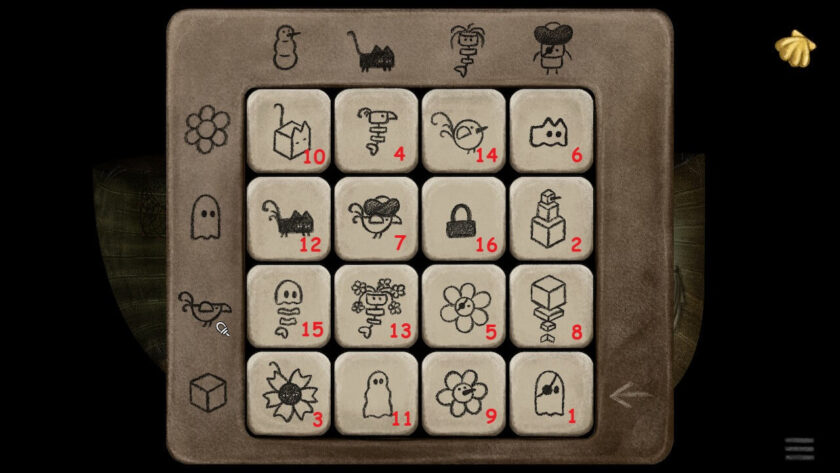
The Fortune Teller
The Fortune Teller needs a candle. Use the match from Hat Can (in the Bar) on the candle.
Solve the pairs game in the crystal ball to receive a map piece.
Return to the Table of Contents
The Lighthouse Keeper
Give the light bulb to The Lighthouse Keeper.
Where was the lightbulb?
After breaking the message in the bottle and scaring the bird, the crane control room lamp breaks.
The Lighthouse Keeper will challenge you to three picture puzzles, where you must select the correct missing piece.
General hint
There is something which connects the first picture with the second, and then the second picture with the third. It might be the number, the shape, or item.
What’s the answer?
The reward is a map piece
Return to the Table of Contents
The Pirate
After you’ve broken the message in the bottle and scared the parrot, you’ll find the parrot on the wharf. As you approach the pirate ship, the parrot will squawk, waking The Pirate, who will throw his crutch at the bird. Pick up the crutch.
What could the crutch be used for?
Return to the top of the crane and use the crutch to dislodge the map piece.
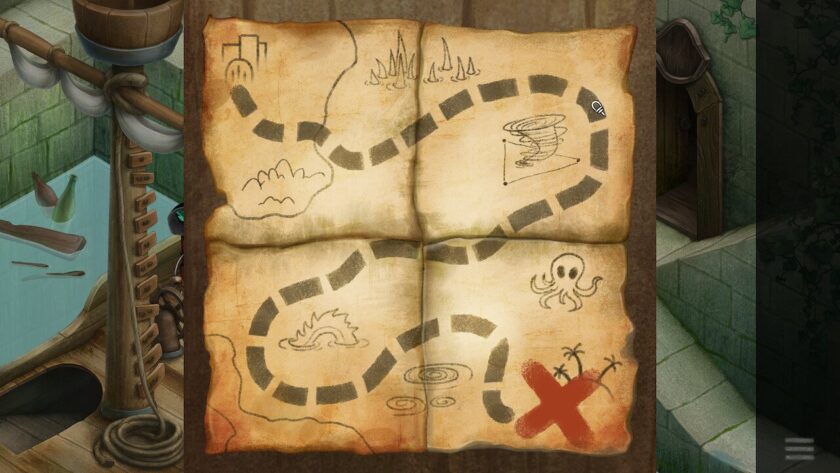
Once you’ve got all three map pieces, look at the board next to The Pirate.
Where are the map pieces?
The Fortune Teller, The Lighthouse Keeper, and the message in the bottle from the Boat Repair Can.
Add the three map pieces to the board and complete the map. Click on a piece to rotate it, or use the arrows to move it round.
What should the map look like?
Return to the Table of Contents
Above Deck & Setting Sail
In order to go to the Island, The Pirate needs the sails released.
Where are the sails?
Climb the mast and grab the three pieces of black rope, holding the sails.
As you climb the mast, the parrot will fly off.
What happened to the Mermaid’s pendant?
Climb into the crow’s nest. You’ll find a feather, a flag and the pendant.
Return to the Table of Contents
Below Deck & The Treasure Chest
The crew member will not allow you to get close to the treasure chest, although they moved for the captain. Perhaps if you look like the captain, they might move.
How to look like the captain?
Use the feather and combine it with the flag. Then use the hat on the crew member.
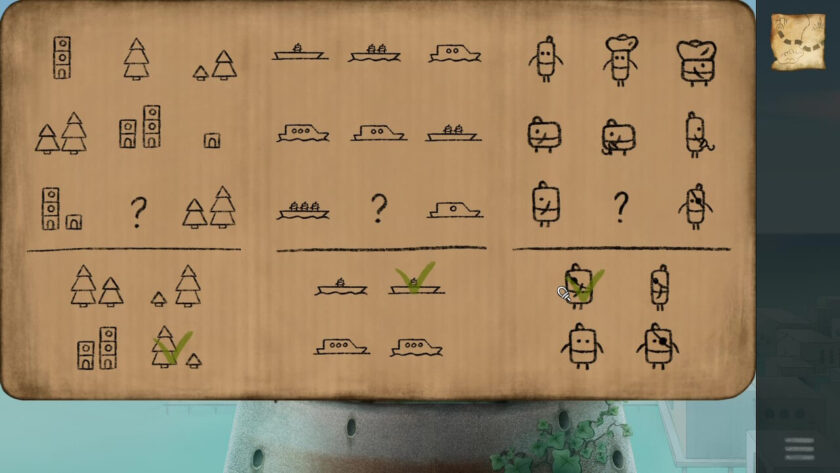
Solve the puzzle on the chest to open it, the starting point is the bottom right.
Hint
Each picture is a combination of those on the column and row headings. The first picture is a pirate ghost, so go along the row where the ghost is, until you get to the column with the pirate. Click on the picture with the three boxes and long nose.
How to unlock the chest
The reward is a dull, oval-shaped piece of metal.
Return to the Table of Contents
In the Sea & The Mermaid
As you descend the anchor chain to recover the telescope, you’ll get stopped by Mermaid Can.
What can you give her?
The mermaid’s pendant, from inside the crow’s nest.
Oh dear, the anchor has broken Mermaid Can’s mirror. No wonder she is upset! You’ll need to find a replacement mirror. Polished metal could work.
Where do I get the metal from?
Inside The Pirate’s chest, below deck on the ship.
How can I polish it?
When the mermaid moved, as you descended the anchor chain, there was a piece of sponge on the rocks behind her. Use that on the metal oval to make a mirror.
The reward is the telescope.
The boat isn’t moving!
Wind up the anchor.
Return to the Table of Contents
Repairing the Totem

Red Can will need a leaf to cover his face, before wandering into the jungle. Once suitably attired, Red Can will be able to walk through the jungle.
Talk to the Purple Can Tribe member and he will explain how the firework and Green Can knocked over the totem. Rebuild it for them.
What goes where?
Place the fish piece at the bottom, next the deer, then the tribe, followed by the birds and finally the star.
Blue paint?
Orange Guard Can wants to play rock, paper, scissors (or rock, leaf, claw). He cheers when he wins and waves his spear in the air, knocking the blue flower on the Tribal Chief’s hut. Let him win three times, so the flower falls to the ground. Take the flower to Purple Can and use the mixed blue paint on the fish section of the totem.
Black paint?
Talk to Green Can. The Fire Lighting Can will be distracted and check the ropes. Use this opportunity to grab some ash from the fire. Give the ash to Purple Can and use the mixed black paint on the deer section of the totem.
Green paint?
Give the leaf on the beach, to the right of the totem, to Purple Can. Use the mixed paint on the tribe section of the totem.
Red paint?
The hermit crab, on the beach by the boat, has some red coral growing on their shell. Give them the bigger shell, found near Purple Can. Pick up the old shell and coral. Give the coral to Purple Can. Use the mixed red paint on the bird section of the totem.
White paint?
Once the other four colours have been mixed, Purple Can will use the tooth from their necklace for the white paint. Use the mixed white paint on the star section of the totem.
The reward is a piece of string with a bead on it.
Return to the Table of Contents
Repairing the Necklace
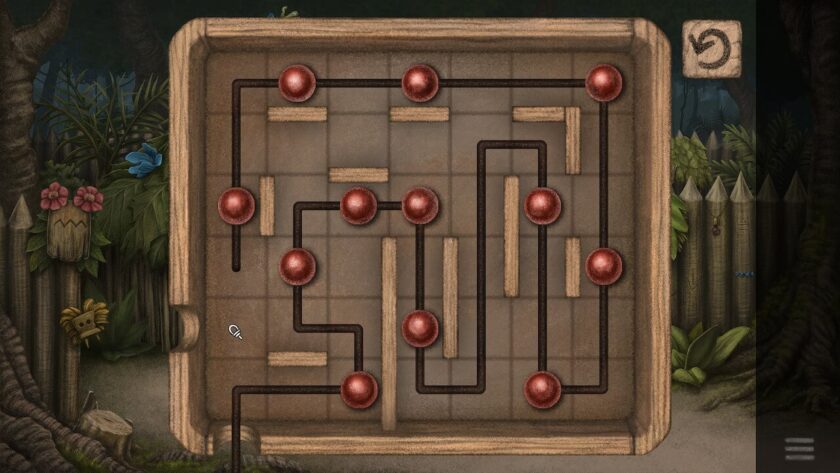
Give the piece of string with the bead on it to the yellow leaf guard. They will then challenge you to some box bead puzzles. The idea being to get all the beads onto the string. You don’t have to use every square. There are various correct answers.
Bead Challenge 1
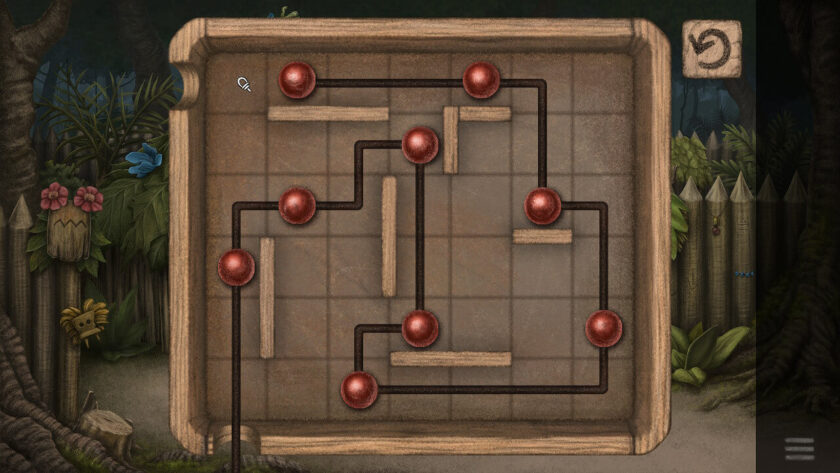
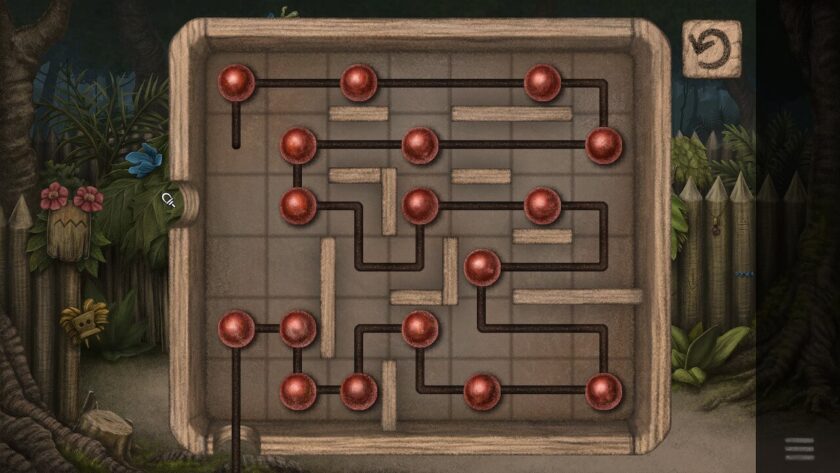
Bead Challenge 2
Bead Challenge 3
You’ll be able to get into the Tribal Chief’s tent now.
Return to the Table of Contents
The End

Hope you’ve enjoyed this Boxville 2 Guide! Have fun helping Red Can rescue his friend!
Do you like our content?
Support LadiesGamers as a member on Patreon!
 Or buy us a cup of coffee or tea on Ko-Fi!
![]()